
Let’s make DIY pinwheels, but not just any paper pinwheels, let’s make giant pinwheels! This pinwheel craft is one of the best summer crafting ideas for kids of all ages. Use our printable pinwheel template with some simple supplies like colored paper, pin and pencil, to make the most amazing homemade pinwheel. This pinwheel craft is fun for home or the classroom.

How to Make a Pinwheel
Summer wouldn’t be summer without colorful pinwheels spinning in the breeze. We’ve started making Giant Color Popping Paper Pinwheels, ready to plant in the flower beds as soon as the sunshine decides to visit and stay awhile! Making pinwheels are a surprisingly easy summer craft for kids that has room for creativity and variation.
Print Our Paper Pinwheel Template
Reduce or enlarge the template for a variety of pinwheel sizes, palm size or giant…. you decide. If you prefer to receive your pinwheel template via email, click the green button:
This article contains affiliate links.
Supplies Needed to Make Paper Pinwheel Craft

- Multiple sheets of colored paper: wrapping paper, scrapbook paper, construction paper
- Glue
- Ruler
- Exacto knife or scissors
- Cutting pad or mat
- Hole punch
- To Make Small Pinwheels: pencil with eraser & stick pin with beaded end
- To Make Giant Pinwheels: wooden rod, eraser, pin & button
- Needle nose pliers
- Printed pinwheel template pdf on paper size of your choice – see file above to download.
Directions for DIY Pinwheel
Video Tutorial: How to Make Paper Pinwheels
Step 1

First glue your contrast paper onto your craft paper, and with a scissors or craft knife use the cutting template to cut out your pinwheel square.
Step 2
Cut diagonal lines in from each corner as shown (don’t worry the guidelines for the length of line are on the template).
Step 3

Next punch every second corner, as shown, and another hole in the centre of the pinwheel.
Step 4

And then start folding in the corners.
Step 5

I put a drop of glue under each corner to hold the corners together while we worked on the handle – Miss7 didn’t have the patience to stay holding!
Step 6

Make sure the holes are all lined up.
Make Pinwheel Spinning Mechanism
The next important part of your paper pinwheel is the spinning mechanism. We are showing you two different way to make a pinwheel spinner so you can choose what would work best with the size pinwheel you are making.
Small Pinwheel Spinner

For small palm size pinwheels it’s super easy – just bend a pin and stick it in to the top of a pencil eraser!! so cool!
How to Make a Giant Pinwheel Spinner

For the giant ones I used a wooden rod, eraser, pin and button.
Step 1

And it’s as easy as this – chop a cube off the eraser, dig out a little hole in the eraser and push in the stick.
Step 2

Thread the pin through the pinwheel holes, I used a button in front for two reasons, one because it was a cute one, and two the button would prevent the pin head making it’s way back through the holes.
Step 3
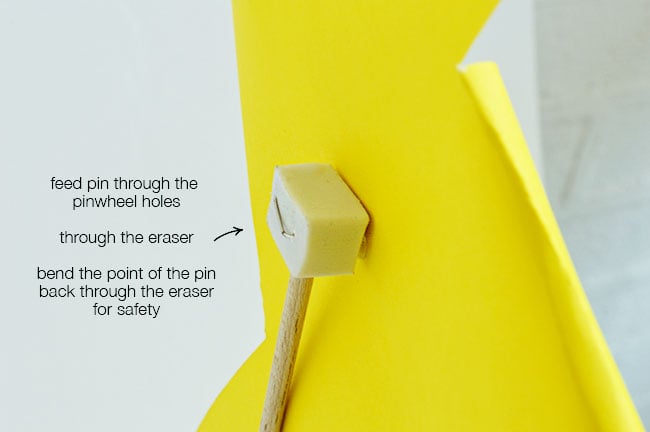
When the pin feeds back through the holes it simply continues through the eraser cube and depending on how long the pin is you might need to bend it back through the eraser to protect little hands from any pointy bits!
Make a Pinwheel Out of Paper

Kids can learn how to make a pinwheel with these simple pictured steps. Younger kids will need some help and use scissors. Older kids and adults will find this pinwheel craft a creative outlet that is a lot of fun! Let's make paper pinwheels!
Materials
- Multiple sheets of colored paper: wrapping paper, scrapbook paper, construction paper
- Small pinwheels: pencil with eraser & stick pin with beaded end
- Giant pinwheels: wooden rod, eraser, pin & button
- Printed pinwheel template pdf on paper size of your choice – see article pdf file and download for free
Tools
- Glue
- Ruler
- Exacto knife
- Cutting pad
- Hole punch
- Needle nose pliers
Instructions
- Start by gluing two pieces of contrasting color or pattered paper back to back and allowing to dry.
- Cut your colorful paper into a square and follow the pinwheel template to create a diagonal cut on each corner.
- Using a hole punch, punch corner holes as shown on template and one hole in the center.
- Fold up the corners of each triangle so that the hole matches the hole in the center and glue in place while finishing the craft with the holes lined up.
- Make a Pinwheel spinning mechanism (if you want to make a small mechanism, please refer to article for instructions) to make a large pinwheel spinner, you will need wooden dowel, eraser, pin, button and needle nose pliers.
- Chop a cube off the eraser and dig out a little hole in the eraser with a craft knife that allows the dowel to be inserted inside.
- Thread the straight pin through a button and then the holes lined up of the paper pinwheel.
- Push the pin through the eraser to secure in place and bend back any sharp edges remaining with your pliers.
Another Paper Craft: Make paper dolls
Craft Variation Ideas for DIY Paper Pinwheel Craft
The essence of these color popping pinwheels is the strong color contrast. We glued colorful craft paper on contrasting wrapping paper. Here are some other DIY pinwheel options to consider:
- Invite your kids to paint, stamp, draw on the craft paper to add a gorgeous individual art patterns to each pinwheel.
- Layer rows of washi tape or duct tape on the craft paper to add your contrast side.
More Summer Crafts & Fun from Kids Activities Blog
- We have a huge selection of 5 minute crafts to cure those little spurts of boredom.
- Whoa…so many fun summer activities & ideas for summer play.
- Follow our simple giant bubble recipe to make the best homemade bubbles…ever!
- Check out our big list of DIY summer crafts for kids…adults love them too.
- Teachers and parents love this list as summer crafts for preschoolers.
- Looking for outdoor water games for hot summer days? We have you covered and cooled down.
- Download & print these fun summer coloring pages for kids.
- An ultimate summer craft is tie dye! Check out all these ideas for tie dye patters and designs the entire family will love to make.
- Pinwheels aren’t the only diy wind spinners craft we have here at Kids Activities Blog…so many fun things to craft!
- Let’s make a colorful suncatcher craft to hang in the summer sun.
- Check out these washi tape crafts!
How big did you make your DIY pinwheels?


This is a great craft for kids! I love that it’s easy to do and can be customized to fit your child’s interests.
Where do you buy your paper?