
I love this DIY Advent wreath craft the entire family will love made with our printable wreath decorations. Making Advent calendar crafts creates a family tradition where memories are revisited each year. This DIY Advent wreath is the perfect DIY Advent calendar for kids and adults.

Advent Wreath Craft
One of my favorite childhood traditions was getting a Christmas Advent Calendar each year. Counting down to Christmas is a tradition I now do with my own children.
Related: More DIY Advent calendar ideas and Easy Paper Wreath Craft with Printable Template
How to Make Advent Calendar WReath
My family loves this DIY Christmas Countdown wreath to celebrate the holiday season each year.
Related: 25 Days of Christmas activities
This article contains affiliate links.
Supplies Needed to Make Advent Calendar Printable Craft
- Wreath Form – I used a 12″ wood form (you can also use cardboard)
- Wooden Clothespins – 50-90 (depending on wreath size)
- Hot Glue or Tacky Glue
- Craft Paint (enough to cover one side of wreath form)
- Washi Tape
- Free Advent Wreath Printables (see below)

Directions to Make An Advent Calendar Wreath
- Layout wreath form on a flat surface and line up clothespins around the form. Find a pleasing amount. Not too close and not too far away from each other.
- Taking approximately a 6″ piece of Christmas Washi Tape; center on top of the clothespin.
- Press the Washi Tape down firmly on clothespin and tuck under both ends. Press down the tape all over.
- Paint the wreath form. Let dry. Once it is dry, lay out the clothespins in a pattern you like. Line up the edge of the clothespins with the edge of the inner circle.
- Hot glue or tacky glue the clothespins in place. Continue all the way around the wreath adding glued clothespins.
- You can mix and match the direction of the clothespins if desired. Or keep them all one direction.

How Many Days Until Christmas Wreath
This wreath is so simple to make, but it is super cute and an exciting way to keep the festive mood going this entire Christmas season!
Plus, this is a great way to keep your kids from asking, “How many days till Christmas.”
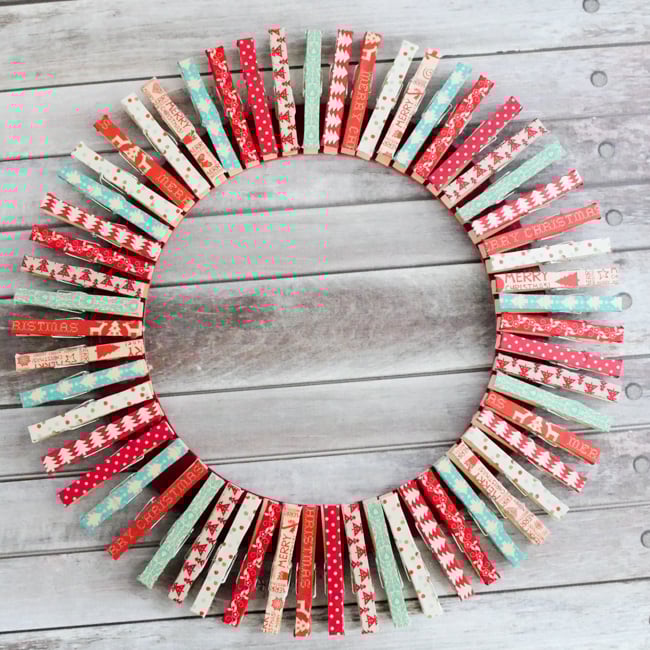
What Your Wreath Will Look Like Before Adding Printables
Because they’ll be able to count down with various Christmas activities to do as a family.

Add Advent Calendar Printables to Your Wreath Craft
1. Print the Advent Printables Decorations
I recommend printing the Christmas Countdown PDF on card stock. Print the paper flowers on regular printer paper.
2. Decorating Your Advent Calendar Wreath with Printables
- Cut out the Christmas Countdown banners – there are two colors to choose. I decided to layer them and use both.
- Find where you want to attach and add a dot of glue to each end.
- Layer a cardboard snowflake if you want on top of banner ends.
- Cut out the paper flowers. You do not need to be exact. It will look like a shabby paper flower and will look adorable either way!
- Starting in the center of the flower, roll the paper around until it is the size flower you want.
- Add a dot of glue to the end of the paper flower to hold together. Decide how many flowers you want to add to the wreath.
- Mixing small and large blooms together.
- Add glue to the back of the flowers and attach to wreath.

Ta-Da! Look what a festive Christmas Advent Calendar you made! It’s decorated and beautiful!

More Free Advent Wreath Printables
Finishing Your DIY Advent Wreath Craft
- Print the Advent pockets – page 1 and 2.
- Cut out all pockets and assemble.
- Cut out, fold on white lines, fold tabs to the back and glue to create a tiny pocket.
- Add slips of paper with your Christmas activities.

Related: Check out these other washi tape crafts!
Finished Christmas Countdown Wreath
I can’t wait to use the Christmas Countdown Calendar in a few weeks to celebrate the joys of Christmas and the meaning of the season.
Need Inspiration on what activities to do with your family…

DIY Advent Wreath Christmas Craft
Let's countdown to Christmas with this diy advent wreath! It's so easy to make and absolutely beautiful! Plus, it will get your whole family in the Christmas spirit!
Materials
- Wreath Form – I used a 12″ wood form (you can also use cardboard)
- Wooden Clothespins – 50-90 (depending on wreath size)
- Hot Glue or Tacky Glue
- Craft Paint (enough to cover one side of wreath form)
- Washi Tape
- Free Advent Wreath Printables (see post):
- Advent Banner
- Paper Flowers
- Large Paper Flowers
- Advent Envelope (Page 1)
- Advent Envelope (Page 2)
Instructions
- Layout wreath form on a flat surface and line up clothespins around the form. Find a pleasing amount. Not too close and not too far away from each other.
- Taking approximately a 6″ piece of Christmas Washi Tape; center on top of the clothespin.
- Press the Washi Tape down firmly on clothespin and tuck under both ends. Press down the tape all over.
- Paint the wreath form. Let dry. Once it is dry, lay out the clothespins in a pattern you like. Line up the edge of the clothespins with the edge of the inner circle.
- Hot glue or tacky glue the clothespins in place. Continue all the way around the wreath adding glued clothespins.
- You can mix and match the direction of the clothespins if desired. Or keep them all one direction.
Add Advent Calendar Printables To Your DIY Advent Wreath
- Cut out the Christmas Countdown banners – there are two colors to choose. I decided to layer them and use both.
- Find where you want to attach and add a dot of glue to each end.
- Layer a cardboard snowflake if you want on top of banner ends.
- Cut out the paper flowers. You do not need to be exact. It will look like a shabby paper flower and will look adorable either way!
- Starting in the center of the flower, roll the paper around until it is the size flower you want.
- Add a dot of glue to the end of the paper flower to hold together. Decide how many flowers you want to add to the wreath.
- Mixing small and large blooms together.
- Add glue to the back of the flowers and attach to wreath.
More Free DIY Advent Wreath Printables
- Print the Advent pockets – page 1 and 2.
- Cut out all pockets and assemble.
- Cut out, fold on white lines, fold tabs to the back and glue to create a tiny pocket.
- Add slips of paper with your Christmas activities.
Christmas Activities & Countdown Fun from Kids Activities Blog
- More count down to Christmas fun for kids.
- Fortnite Advent calendar…yep!
- Costco’s dog Advent calendar that has treats for your dog every day!
- Chocolate Advent calendar…yum!
- Beer Advent calendar? <–Adults will love this!
- Costco’s wine advent calendar! <–Adults will love this too!
- My First Advent Calendar from Step2 is really fun.
- What about a slime Advent calendar?
- I love this sock Advent calendar from Target.
- Grab the Paw Patrol Advent calendar!
- Check out these Advent activities calendar.
- We love this book advent calendar! Let’s read a book a day in December!
- We also have 40 Christmas treats you can make together!
- We have 100s of Christmas activities for families to do together.
More Christmas Wreath Fun From Kids Activities Blog
- Easy Christmas Wreath Craft For Kids Using Paper Plates
- Easiest Christmas Wreath For Kids Of All Ages
- Christmas Wreath Crafts
- Christmas Wreath Paper Craft For Kids
- Paper Plate Christmas Wreath
- Let’s Make An Origami Wreath For Christmas
- Christmas Button Wreath
- DIY Advent Calendar Wreath Craft Made With Free Printables
- Easy Paper Wreath Craft with Printable Template
- DIY Star Wars Holiday Wreath
- DIY Wreath Kit For Kids
How did your Christmas advent wreath craft turn out?


Yes, it does help! Thank you for replying. I’m enjoying the project.This wreath is such a clever and fun idea. Would you mind me asking which printer you use for cardstock? Cardstock is to heavy for the one I have. I’m thinking of tracing the pattern onto the cardstock then gluing the design on top. If I can figure out how to insert a picture when I’m finished, I will.
Thanks again,Sue
Hi Sue! I am so glad you are enjoying it! As far as I know card stock will work with almost any printer!
Hi Tracy,
I’m in the process of making the wreath, and I’m curious if the Advent pockets are clued on or held by the clotherspins?
Thanks, Sue
Hi, Sue!
You glue the clothespins in place, then cut out, fold, and glue the printable to create the pockets (you do glue those). After, use the clothespins to hold the pockets (you don’t have to glue them to the clothespins though, so you can remove them at the end of the holiday season, and then redo it next year!) I hope that helps!
Super Cute!
What a CUTE IDEA!!! This is definitely something I would like to do as a family!