
We are doing glow in the dark art today! Kids of all ages will love this glow in the dark art that also doubles as a card. This glow in the dark art is a unique way to not only make a cool and spooky picture, but to make a card. Why would you need a glow in the dark card? It’s the most perfect way to invite someone to your Halloween party! This glow in the dark art project is great whether you’re at home or in the classroom.

Glow In The Dark Art
Today we are making glow-in-the-dark cards using paint and cookie cutters as stencils. This is a simple art project for kids of all ages — even younger kids!
These cards were specifically made for Halloween, and made a great Halloween card or Halloween party invitation. But the simple painting technique could be used all year round to make spooky glowing in the dark art.
Make Glow in the Dark Cards
Everything on the supplies list are things that you probably already have at home with the exception of the glow in the dark paint. This simple DIY project can be a good excuse to buy glow in the dark paint that can be used for other kids art ideas in the future.
This article contains affiliate links.
Supplies to Make Glow in the Dark Art
- glow in the dark paint
- paper
- paint brushes
- stencils or cookie cutters (optional)
- letter stamps (optional)
Glow in the Dark Paint Tips for Painting with Kids
- Cover your work surface and wear paint clothes.
- The glow in the dark paints I found are acrylic and not washable.
- We chose a collection of paint colors so they were not just Halloween colors giving flexibility to any projects we might tackle in the future.
Use Cookie Cutters as Stencils
Cookie cutters make great stencils. There are few different ways you can use cookie cutters to make shapes for your cards:
1. Cookie Cutters as Stamps
- Dip the cookie cutters into paint, and press the cookie cutter to the paper to make a print.
- Paint the cookie cutter using a brush. Then, press the cookie cutter to the paper to make a print.
2. Cookie Cutters as Traditional Stencil Patterns
Use the cookie cutter like a stencil. Place the cookie cutter onto the paper. Paint around the inside of the cookie cutter.

How to Make Glow in the Dark Cards
Step 1
Use various cookie cutters or stencils to create a design for your card. You can leave the inside of your shape open, or you can fill it in with more paint.
Step 2
When you are finished, take your design into a dark room, and watch it glow. The glow fades after a little while.
To make the glow last longer, add an extra layer of paint. The longer you charge the paint in the sunlight (or overhead light), the longer the glow will last as well.
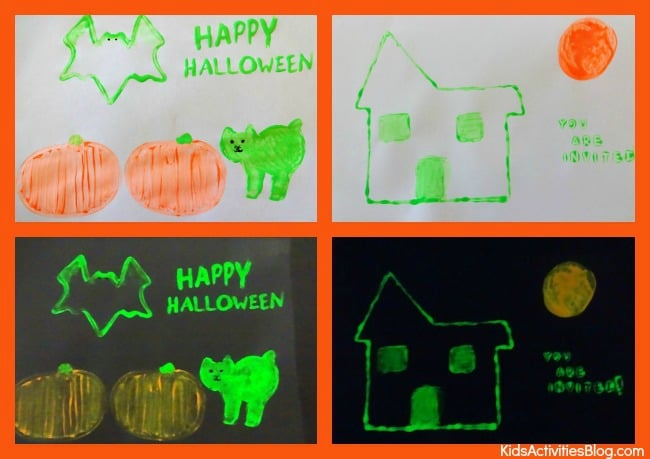
Our Experience Making Glow in the Dark Cards for Halloween
I thought the house shape would work well as an invitation to a Halloween party. You can see how I used letter stamps to stamp “YOU ARE INVITED” on the paper. I dipped the stamp into the paint. When I pressed the stamp to the paper, the paint spread around the letters on the stamp, so I ended up with a negative of the letters. I thought this looked pretty cool, so I kept it.
For the other card, I simply hand painted “HAPPY HALLOWEEN” onto the paper with a skinny paint brush.
Fun Glow In The Dark Art

This glow in the dark art doubles as a glow in the dark Halloween card! Whether you're saying Happy Halloween or inviting someone to your Halloween party this glow in the dark art is so much fun to make.
Materials
- glow in the dark paint
- paper
- paint brushes
- stencils or cookie cutters (optional)
- letter stamps (optional)
Instructions
- Dip the cookie cutters into paint, and press the cookie cutter to the paper to make a print.
- Paint the cookie cutter using a brush. Then, press the cookie cutter to the paper to make a print.
- Use the cookie cutter like a stencil. Place the cookie cutter onto the paper.
- Paint around the inside of the cookie cutter.
- Use various cookie cutters or stencils to create a design for your card. You can leave the inside of your shape open, or you can fill it in with more paint.
- When you are finished, take your design into a dark room, and watch it glow. The glow fades after a little while. To make the glow last longer, add an extra layer of paint. The longer you charge the paint in the sunlight (or overhead light), the longer the glow will last as well.
Notes
- Cover your work surface and wear paint clothes.
- The glow in the dark paints I found are acrylic and not washable.
- We chose a collection of paint colors so they were not just Halloween colors giving flexibility to any projects we might tackle in the future.
More Halloween Activities from Kids Activities Blog
- Make Halloween puppets with these printable shadow puppet templates.
- This set of free printable Halloween games includes a Halloween word search, a candy corn maze and make up your own spooky story.
- Play Halloween bingo with this free printable!
- Color then cut this printable Halloween puzzles worksheet.
- These free printable Halloween facts are fun and you will learn something…
- Make your own Halloween drawings with this simple printable tutorial.
- Or learn how to make a pumpkin drawing easy with this how to draw a pumpkin step by step guide.
- Here are some free pumpkin carving patterns stencils you can print at home.
- Any Halloween party is better with a printable Halloween hidden pictures game!
- Halloween activities for kids can make the whole month of October extra fun. Glowing in the dark cards are just one fun Halloween activity.
- Maybe you’ll be interested in something a messier activity? If so, you’ll love this creepy crawly Halloween sensory box.
- Need something less messy? Then make Halloween educational with these Halloween tracing worksheets or these Halloween math activities.
- Check out these 17 Glow in the Dark games for kids!
- Make your own diy stamps for kids to decorate your cards!
Have you ever used glow in the dark paint? What have you created?


I have a niece and nephew that would love glow in the dark cards at any time of year!
love this one! my daughter will be excited to create a whole bunch of cards!
What a really cool idea! My son would love the glow in the dark paint.